Step 1:
Contact MuchSkills support to add your domain/s at support@muchskils.com
Step 2:
1. Log in to your Azure Portal
2. Go to Azure Active Directory
3. Go to Enterprise applications
4. Click New application
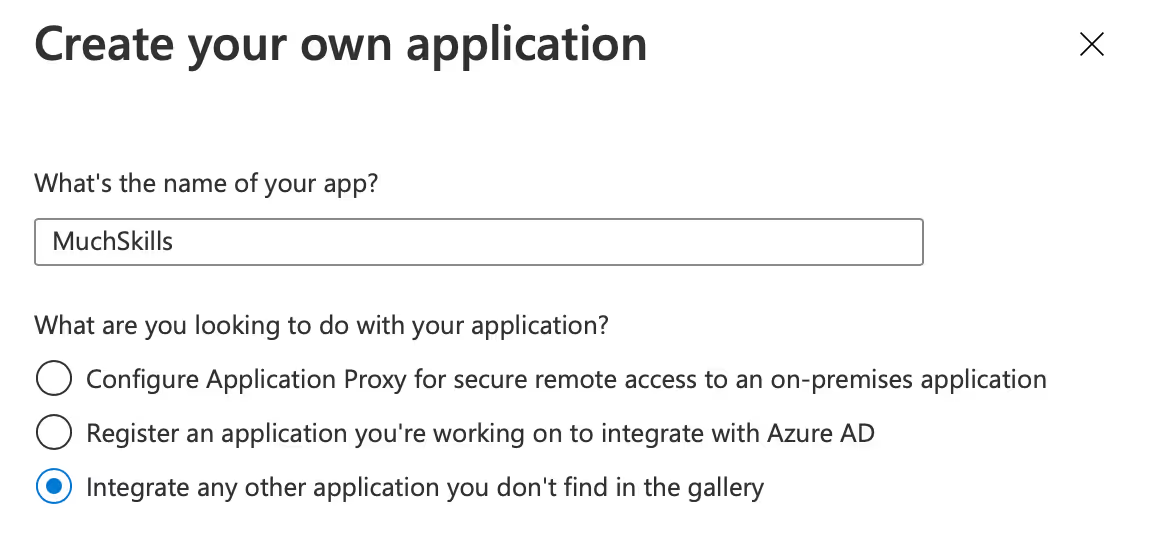
5. Click Create your own application
6. Enter MuchSkills as the name of your app and click Create
7. Click on Single Sign-on
8. Select SAML
9. Click Edit on Basic SAML configuration
10. Enter https://app.muchskills.com/auth/saml in Identifier (Entity ID)

11. Enter your SSO url in Reply URL
12. Click Save
13. Click Edit on User attributes & Claims
14. Click on Unique User Identifier (Name ID)
15. Set Source attribute to user.mail

16. Click Save
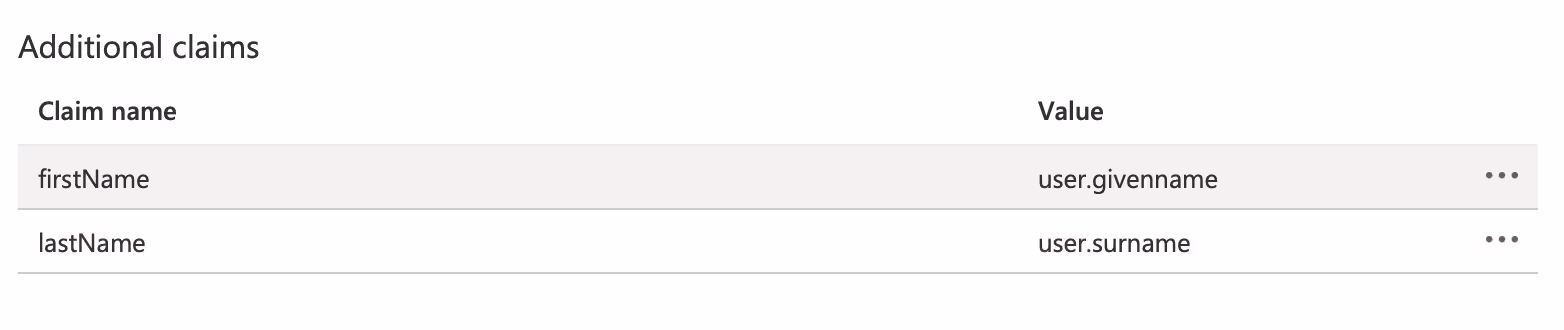
17. Make sure you have the following additional claims
18. You're done!
Step 3:
MuchSkills setup
1.Go to Security & SAML in team settings (Team > Edit > Security & SAML)
2. Enter or paste the IDP Metadata URL. See the attachments to find the
URL for the specific IDP

3. You can activate SAML and, if desired, enforce its usage. To do this, go back to 'Security & SAML' in the team settings (Team > Edit > Security & SAML), and switch on 'Enable SAML'. You also have the option to toggle 'Enforce SAML'.
It's crucial to test the SAML login process after these changes. Ensure everything is working correctly by logging out and attempting to log in again using the SAML method. This step confirms the successful integration of the SAML setup with MuchSkills.
Important to know
After completing the SAML setup, make sure you assign users and/or groups who should have access to the MuchSkills application.
You can do this by going to:
Azure Portal > Azure Active Directory > Enterprise Applications > MuchSkills > Users and groups > Add user/group

If unsure, ask your system administrator for assistance.
It's crucial to test the SAML login process after all above changes. Ensure everything is working correctly by logging out and attempting to log in again using the SAML method. This step confirms the successful integration of the SAML setup with MuchSkills.


